
3D 프린팅
3D Printed Lithophane from a Photo: Free, No Software
빠른 답변
Prepare a high-contrast photo, convert it with the Lithophane preset (0.8 mm base, 2.4 mm relief), print it in white PLA at 100% infill and light it from behind. The photo never leaves your browser.
시작하기 전에
- A lithophane is thicker where the photo is dark and thinner where it is light.
- Start with a 0.8 mm base and 3.2 mm maximum thickness; the converter’s Lithophane mode fills these in.
- Print in white PLA at 100% infill and light it from behind with an even, diffuse light.
A 3D printed lithophane is a thin panel that shows a photo when light shines through it. Darker parts of the image are printed thicker so they block more light, and lighter parts are thinner. You can make one for free without installing any software: prepare your photo, convert it to an STL with the image to STL converter in Lithophane mode, print it in white filament and put a light behind it. The conversion runs in your browser, so the photo is never uploaded, which matters when it is a picture of your family.
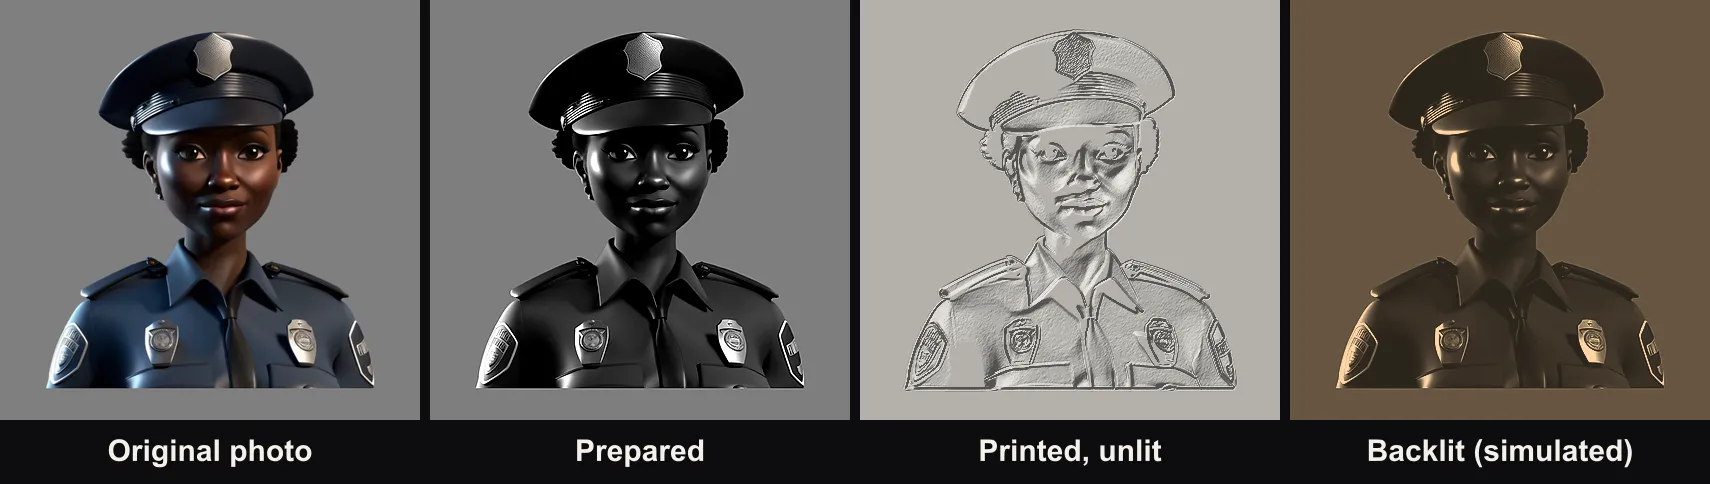
The last two panels are computed with the same thickness mapping the converter uses (0.8–3.2 mm): first as the white relief looks in daylight, then with light passing through it. They are a simulation, not a photo of a print, but they show what each setting does before you spend filament.
Step 1: Pick and prepare the photo
Lithophanes reward contrast and simple subjects:
- Faces, pets and landscapes with clear light and dark areas work best.
- Avoid busy, low-contrast or very dark photos. They turn into a muddy grey slab, the most common reason a lithophane "looks like a weird image instead of a photo".
- Crop tightly around the subject. Small details get lost at typical print sizes.
Then spend two minutes preparing it in any photo editor (your phone’s editor is enough):
- Convert to black and white. Color carries no information in a lithophane, and seeing the grey values makes the next steps easier.
- Set the black and white points. Use Levels or Auto contrast so the darkest area is near black and the brightest near white. A flat photo wastes most of the 2.4 mm range.
- Add a little contrast, about +15 to +20. More than that crushes shadows into solid blocks.
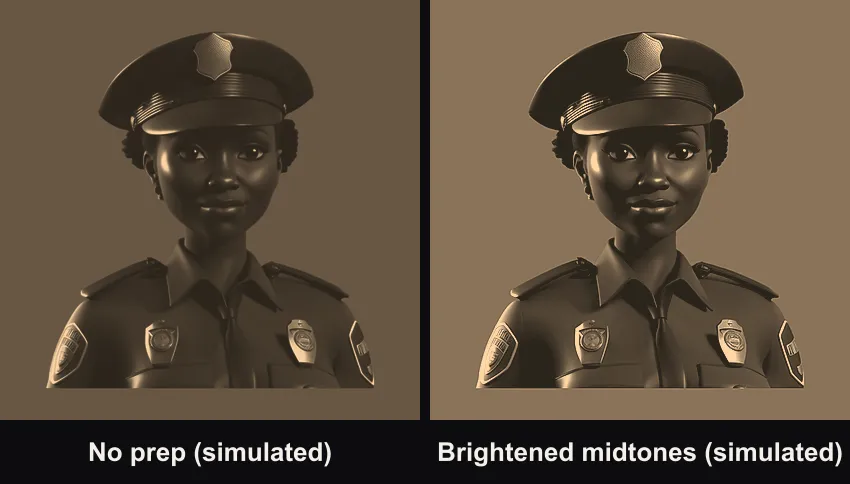
- Brighten the midtones if faces are dark. Dark skin, dark hair and shadows print thick and stay dim. Lift the midtones (a curve or "shadows +") until faces are clearly mid-grey.
- Sharpen lightly, and only once. Strong sharpening prints as halos.
Here is what step 4 does to a dark portrait once it is backlit:
Step 2: Convert the photo to STL
Open the free image to STL converter in Lithophane mode and upload your photo. Lithophane mode fills in these starting values for you:
| Setting | Lithophane preset | What it does |
|---|---|---|
| Width | 100 mm | Print size; 80–150 mm works well |
| Base thickness | 0.8 mm | The thinnest, brightest areas |
| Relief height | 2.4 mm | Extra thickness for the darkest areas (3.2 mm total) |
| Detail | 180 | Raise to 220–250 for large prints; files get bigger |
| Invert | On | Makes dark pixels thick, which a lithophane needs |
| Smooth | On | Removes pixel noise that shows up as bumps |
Rotate the live preview to check it, then click Download STL. If you want to see the file again before slicing, the STL viewer shows its size and whether it is watertight, and the 3D viewer lets you rotate it in more detail.
Step 3: Choose filament and slice it
Which filament to use
| Filament | Result | Use it when |
|---|---|---|
| White PLA | Clean, neutral tones; the reference choice | Almost always |
| Natural (clear) PLA | Brighter, slightly lower contrast | Thick or very dark photos |
| White or natural PETG | Similar tones, tougher and more heat-resistant | Night lights and lamps that get warm |
| Colored PLA | The color absorbs light and hides detail | Only for an effect, never for portraits |
Slicer settings
- Infill: 100%. Any infill pattern shows as a grid across the picture.
- Layer height: 0.12–0.16 mm for smooth tones.
- Orientation: standing upright gives the finest detail because the nozzle draws the relief in profile, but it is taller and slower and needs a brim to stay up. Printing flat is faster and more reliable.
- Speed: slow down the outer walls for clean edges.
- Time and material: a 100 mm lithophane usually prints in 2–5 hours and uses about 15–25 g of filament.
Step 4: Light it up
A lithophane looks like a plain white relief until it is backlit. The light source decides how good it looks:
| Light | Distance behind | Notes |
|---|---|---|
| LED strip in a stand or box | 2–5 cm | Even and cool-running; the best choice for a finished piece |
| Desk lamp | 10–20 cm | Easy to test with; move it back if you see a hot spot |
| Window daylight | Against the glass | Free and bright, but only works during the day |
Even light matters more than bright light: a bare bulb close behind the print creates a bright spot in the middle. Warm white (about 2700–3000 K) gives the classic sepia look; cool white (5000–6500 K) makes the contrast crisper and the greys more neutral.
Curved and cylinder lithophanes
Curved lithophanes stand up on their own and can be seen from a wider angle, and cylinders wrap around a tea light or a lamp. Our converter makes flat panels. To curve one:
- Bend the flat STL in Blender with a Simple Deform modifier set to Bend. A 100 mm wide panel bent through 120° has a radius of about 48 mm; through 90°, about 64 mm.
- Or use a dedicated lithophane maker that outputs curved and cylindrical shapes directly.
Keep the same 0.8–3.2 mm thickness range; curving does not change how much light passes through.
Stands and frames
A flat lithophane needs something to hold it upright in front of a light. You can print a simple slotted stand:
- Slot width: total thickness plus 0.3–0.4 mm of clearance, so about 3.6 mm for a 3.2 mm lithophane.
- Slot depth: 5–8 mm.
- Base: at least as long as the lithophane is wide, with a hollow behind the slot for an LED strip.
Many free stand and lamp-box designs are also shared on model sites; search for "lithophane stand" and match the slot to your thickness.
Troubleshooting
- The image is too dark overall: brighten the photo’s midtones or reduce the relief height.
- Faces look blotchy: turn on Smooth and lower the detail slightly.
- A grid shows across the picture: infill is not 100%.
- Visible lines across the picture: reduce layer height and print more slowly.
- A bright spot in the middle: move the light further back or add a diffuser.
Want a full 3D object instead of a flat picture? Turn a photo into a 3D model with AI and export it as STL. Our guides on making a 3D model from a picture and comparing AI 3D model generators cover that route, and all the free converters and viewers are on the tools page.
Frequently asked questions
How do I turn an image into a lithophane?
Prepare the photo (crop, convert to black and white, raise the contrast), open the free image to STL converter in Lithophane mode, upload the photo and download the STL. Then slice it at 100% infill in white PLA and print.
What filament is best for lithophanes?
White or natural (unpigmented) PLA. It is easy to print and lets light through evenly, so the tones read cleanly. Colored filament absorbs light and hides the picture.
How do you build a lithophane?
A lithophane is built from a height map: each pixel becomes a thickness between a minimum (light areas) and a maximum (dark areas). Our converter builds that solid for you with a flat back, so you only choose the size and thickness.
Can I make a lithophane with PETG?
Yes. Natural or white PETG works and is tougher and more heat-resistant than PLA, which helps in lamps. It strings more and transmits light slightly differently, so print a small test and adjust the relief height if it looks too dark or too washed out.
What is the smallest lithophane that still looks good?
About 60 mm wide for a face; below that, eyes and mouths blur at normal nozzle sizes. 80–150 mm is the sweet spot for most photos.
Why does a lithophane need 100% infill?
Any infill pattern inside the print blocks light unevenly and shows up as a grid across the picture. With 100% infill, the thickness alone controls how much light passes through.
How long does a lithophane take to print, and what does it cost?
A 100 mm lithophane usually takes 2–5 hours depending on layer height and whether it stands upright. It uses roughly 15–25 g of PLA, well under a dollar of filament. The STL itself is free.
Can I make a color lithophane?
Our converter makes single-material lithophanes. Color lithophanes need a multi-material printer and layered color filaments, which is a separate workflow. A warm light behind a white print is the simplest way to add tone.
Can I sell lithophanes I make with this tool?
Yes, the STL is yours to print and sell. You need the right to use the photo itself, so use your own pictures or ones you have permission for.
My lithophane failed. What should I change for the reprint?
If it is too dark, brighten the photo or lower the relief height. If you see a grid, check infill is 100%. If edges are rough or lines cross the picture, lower the layer height and slow the outer walls. If it fell over, print it flat or add a brim.
Example image: TripoSR examples (MIT license). Printed and backlit panels are simulated from the converter’s thickness map.