
Guides
How to Make a 3D Model from a Picture (Step by Step Guide)
Réponse rapide
Upload one clear picture to an AI image-to-3D generator, check the model from every side, then download GLB, STL or OBJ. It takes about two minutes. Scanning and hand modeling are better when you need exact dimensions.
Avant de commencer
- For most people, AI from one picture is the fastest way to a 3D model; scanning and modeling by hand win on accuracy.
- The picture decides most of the quality: one subject, plain background, even light.
- Always rotate the model and check the back side the AI had to invent before you print it.
This guide shows how to make a 3D model from a picture: choose the right photo, turn it into a textured 3D model with AI in about two minutes, check it from every side, and export it for Blender, a game engine or your 3D printer. If you just want to try it now, the image to 3D converter does the generating while you follow along.
Three ways to make a 3D model, and which to choose
There are three ways to make a 3D model of something you have a picture of. They differ hugely in time, skill and accuracy, so pick the one that fits the job before you start.
| Method | What you need | Time | Skill needed | Best for |
|---|---|---|---|---|
| AI from one picture | One clear photo or illustration | 1–3 minutes | None | Figurines, toys, characters, products, props |
| Photo scanning (photogrammetry) | 20–100 photos taken around the object | 1–3 hours | Some practice | Real objects you can walk around |
| Modeling by hand | Blender, Tinkercad or CAD software | Hours to days | Learning the software | Parts with exact dimensions, mechanical fits |
AI from one picture is the fastest. The AI estimates depth, invents the sides it cannot see and paints textures on the result. It works from a single photo, a drawing or AI-generated art, so it is the only option when you have just one picture, such as a pet, a character or a product shot from a website. The trade-off is accuracy: the hidden back side is a guess, and sizes are not exact. This guide covers this method.
Photo scanning reconstructs a real object from many overlapping photos. It is accurate to the object in front of you, but you need the object itself, consistent light and patience. Shiny, transparent and very thin things are hard for it too.
Modeling by hand in Blender or Tinkercad gives you complete control and exact dimensions, which matters for brackets, cases and anything that must fit something else. It also takes the longest and means learning the software. A useful shortcut is to generate a model with AI first and then fix or measure it in Blender.
If you want something you can see, share or print today and you are not designing a precise part, use AI. The rest of this guide is the step-by-step for that.
Step 1: Choose a picture the AI can read
The AI has to guess everything it cannot see, so the input picture matters more than any setting. The best results come from pictures with:
- One subject, fully in frame. No cropped feet, hands or edges.
- A plain background. White, grey or any single color works well. Busy scenes are the most common cause of failed models.
- Even lighting. Strong shadows and glare get mistaken for shape.
- A front or three-quarter view. The less the AI has to invent, the better the back side looks.
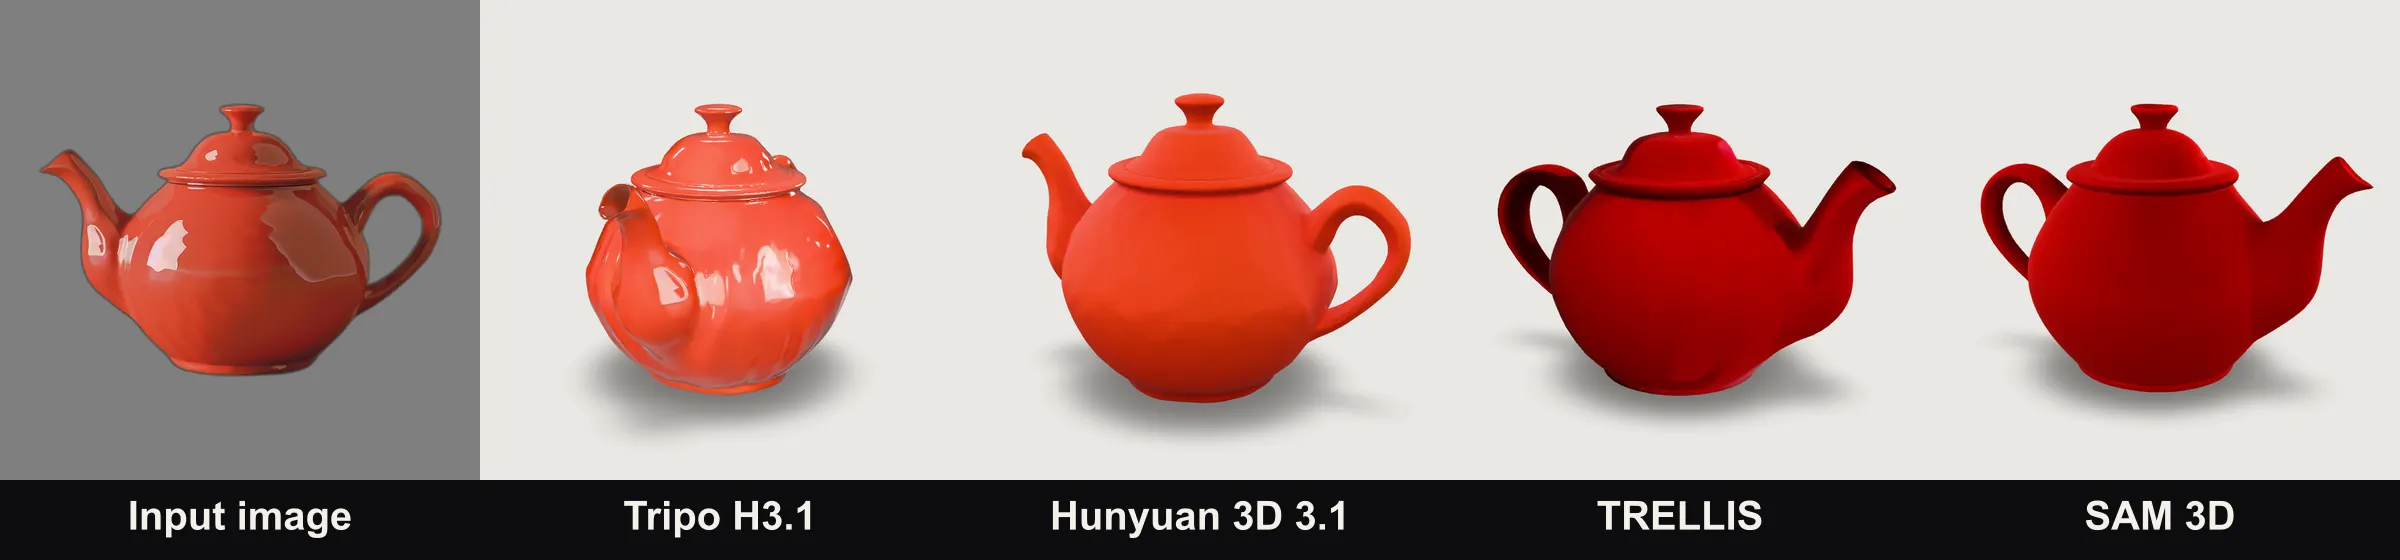
Here is what that looks like in practice. In our side-by-side test of four AI 3D model generators, a clean product shot worked with every model:
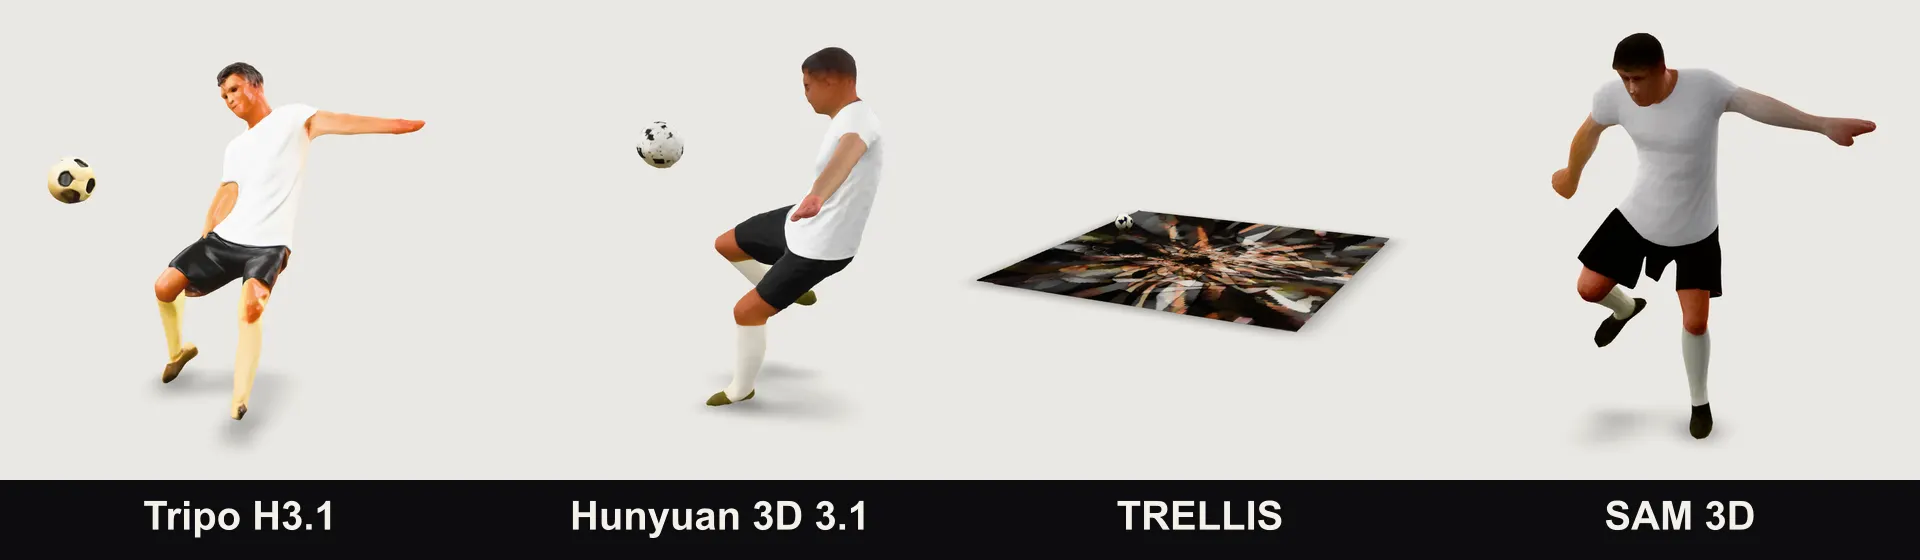
The same test with a real action photo, a small player against a busy background, split the models. Three of them separated the player; one turned the whole scene into a flat slab:
Product photos, toys, figures, illustrations and AI-generated character art are all good candidates. Glass, mirrors, hair-thin parts and transparent objects are the hardest.
Tip: if your photo has a messy background, remove it first with any background-removal tool and save the result as a PNG with transparency.
Step 2: Generate the 3D model
Open the image to 3D converter, upload your JPG, PNG or WEBP and start the generation. Behind the scenes the AI:
- Estimates depth from the picture.
- Predicts the hidden sides of the object.
- Builds a mesh and paints PBR textures (color, roughness and normal maps) onto it.
This usually takes one to three minutes, and the finished model appears in your history.
Can you do it for free? Most AI generators, ours included, let you try before you pay; the current free allowance and the price per model are on our pricing page. If your picture is flat artwork rather than an object, such as a logo, a sign or a photo for a lithophane, the image to STL converter is free and runs in your browser without an account.
Step 3: Inspect the result
Do not judge the model from the first angle. Rotate it fully and look for:
- The back side. Is it plausible, or did the AI flatten it?
- Thin parts like fingers, straps and table legs. These are often merged or missing.
- Faces and text. Small details may be simplified or come out dark.
- Floating fragments around the main object.
If the shape is wrong, the fix is almost always a better picture, not another attempt with the same one. Crop tighter, remove the background or take the photo again in softer light.
Step 4: Download and convert
On our site every model downloads as GLB, STL or OBJ at the same price:
- GLB keeps the mesh and textures in one file. It opens directly in Blender, Unity, Unreal Engine, Godot, Three.js and Windows 3D Viewer, and you can preview it in our free 3D viewer.
- STL is the format every 3D printing slicer reads.
- OBJ is the most widely supported exchange format.
If you need another format, such as FBX for animation tools, convert it in Blender:
- File → Import → glTF 2.0 and choose the GLB.
- Check the scale (press N to see dimensions).
- File → Export and choose the format you need.
Step 5 (optional): Prepare it for 3D printing
AI models are made for screens first, so a quick check before printing pays off:
- Scale the model to the size you want in millimetres.
- Add a flat base or cut the bottom flat so it sits on the bed.
- Check wall thickness. Keep walls at about 0.8 mm or more for FDM printers and 0.5 mm for resin.
- Repair the mesh if your slicer reports errors; most slicers can fix small holes automatically.
Open the exported file in the STL viewer to confirm its size, whether the mesh is watertight and its volume, then slice it as usual.
Printing a person, a pet or a character? The 3D figurine from photo page walks through picking the right portrait, posing and printing figurines in more detail.
Ready to try it?
You now know how to make a 3D model from a picture: pick a clean photo, generate it, check every side, then export and print. Upload your picture to the image to 3D converter to make your first model, or compare the AI models behind it in our AI 3D model generator test.
Frequently asked questions
Can I convert a picture into a 3D model?
Yes. An AI image-to-3D generator turns one picture into a textured 3D model in one to three minutes. It works best with a single object on a plain background, photographed straight on or at a three-quarter angle.
How can I make a 3D model from a picture for free?
Many AI generators have a free allowance, and ours gives you your first model free when you sign up with Google; current allowances are on the pricing page. For a flat picture such as a logo or a photo for a lithophane, the image to STL converter is free with no account.
Can ChatGPT turn an image into a 3D model?
Not directly, as of November 2026. A chat assistant can describe an object or write a Blender or OpenSCAD script for simple shapes, but it does not produce a textured 3D mesh from a photo. For that you need a dedicated image-to-3D model.
How can I make a 3D model from a picture without AI?
Use the picture as a reference and model the object by hand in Blender or Tinkercad, or take 20 to 100 photos around the object and build it with photogrammetry software. Both take longer but give you full control over the shape.
Can I 3D print a model made from a picture?
Yes. Download it as STL, scale it to the size you want, add a flat base and check that the mesh is watertight and the walls are thick enough before slicing. Our STL viewer shows size, watertightness and volume.
Can I use the 3D model commercially?
On our site, yes: you can sell, print and publish your models as long as you own the picture or have the right to use it. Other tools differ, and some free plans are non-commercial, so check each one’s terms.
How many photos do I need?
One. Single-image generators work from one photo. Extra views only help tools that accept multiple images, and photogrammetry needs dozens.
Can I make a 3D model from a photo on my phone?
Yes. Shoot the object straight on against a plain background in good light, then upload the photo from your phone’s browser.
How long does it take?
Usually one to three minutes per model with AI, compared with hours of photo capture for scanning or hours to days for modeling by hand.
What if the model comes out wrong?
Change the picture, not the setting: crop to one subject, remove the background and use even light. If a generation fails outright, the credits are returned automatically.